Heath Care

Our Missionis to provide natural health information and products that will revolutionize your personal journey to better health.

Every skin type would be smart to slather on sunscreen year-round.


What’s more, this lack of humidity means that people who found they could skip moisturizer in the summer suddenly need to start using one now — or step up to a heavier one.hat’s why for fall, the biggest adjustment will likely be to your moisturizing routine, no matter your skin type. Depending on if you’re oily, dry, or somewhere in between, you’ll be looking for a lotion (made with a large water content, making it a lightweight hydrator), cream (the next step), or an ointment (the strongest option).
If you abused your skin this summer [in terms of sun exposure] or now have bad breakouts from constant sweat and sunscreen application, then peeling off that top layer of skin with a treatment like a chemical peel or laser resurfacing can help try to reverse the damage.

For Oily Skin, Focus on Skin Care That Sops Up Sebum

There’s a lot of good news with the switch of the seasons: “Fall can be a great time for patients with oilier skin. They are at a lower risk of a breakout than during spring and summer. It’s almost like the environment is appropriately medicating their skin, which is a beautiful thing”. After washing with a gentle cleanser , he suggests applying a moisturizer containing hyaluronic acid, which acts as a humectant to attract water to skin, and can appropriately hydrate acne-prone complexions without prompting breakouts,

If You Have Dry Skin, Find a Rich Ointment

“Dry skin can change from a nuisance to a disaster during the fall,”. “As humidity levels drop, evaporation of water from the skin increases, and this can sneak up on people. Fall is ‘eczema season’ for this reason; dry skin cannot protect itself from factors causing inflammation, resulting in dry, cracked, irritated skin.

Still, there are several tweaks you can make to your routine to preserve your skin’s barrier in the autumn. Make sure you’re not damaging the epidermis (top layer) with your existing skin-care routine. If you’re still using a facial brush or scrub to cleanse skin, give them up now, says Hollmig. You should also make the switch to a thicker moisturizer, preferably an ointment like Aquaphor Healing Ointment.

For Managing Combination Skin, Adopt a Two-Pronged Approach

Combination skin types often notice that they have an oily T-zone with drier cheeks. What seems like a complexion challenge is actually straightforward.For combination skin, you’ll need to reach for two levels of moisturizer. Now that drier fall weather is here, your T-zone might be far less oily than it was in the summer, and you may be more willing to moisturize. In the T-zone area, apply a lightweight moisturizer (these are lotion-based, not creams) labeled noncomedogenic or none at all.

If You Have Signs of Aging, Bring Back Retinoids

Retinoids and retinols, vitamin A derivatives, have been the gold-standard in preventing fine lines and wrinkles because, as Harvard points out, they stimulate collagen production, the most commonly present protein in the skin that helps maintain its smooth texture, per the Cleveland Clinic.
Here’s the rub: Retinoids exfoliate the top layer of skin, and are known to increase sun sensitivity.
As long as your skin type allows (meaning: You don’t have exceptionally dry, eczema-prone skin), this is a good opportunity to bring back a retinoid in your nightly routine, like Skinbetter Science's AlphaRet Overnight Cream , which contains a combination retinoid and alpha hydroxy acid (AHA).

The best way to keep your skin hydrated and moisturized in the cool-weather months depends on your skin type and skin condition.


It's the height of fall, and in some places winter is well underway. You've probably already changed up your wardrobe. But what does your skin-care routine look like?

When switching over your skin-care products for colder weather, it’s important to take your skin type into account. Whether you’ve got dry, oily, or combination skin — or a skin condition like psoriasis — here’s how to winterize your routine, adding key ingredients to the mix, so you can keep your skin healthy and radiant all season long.

Sea Buckthorn Oil Can Help Combat Dry Skin

Dealing with dry skin that only seems to get worse in the winter? After washing your face (ideally with a soap-free cleanser or micellar water), apply a thin coat of an antioxidant-rich serum and allow it to soak in for several minutes, suggests Dr. Levine. Then, apply a creamy moisturizer to help lock in hydration.
You can also put a drop of rose, marula, or sea buckthorn oil directly onto the skin or add it to your face cream for even more moisture, suggests Francesca Fusco, MD, an assistant clinical professor of dermatology at the Icahn School of Medicine at Mount Sinai in New York City.
Sea buckthorn, an increasingly popular ingredient in skin-care products, is loaded with an array of fatty acids and vitamins that stimulate skin regeneration and repair, according to a study published May 2017 in Lipids Health and Disease. A few drops of the oil itself packs a hefty dose of hydration for parched, flaky skin and reduces the appearance of fine lines and wrinkles.

Hyaluronic Acid Serum to Hydrate Oily Skin

“Even oily skin needs moisture,” says Levine. The trick to hydrating an oily complexion is to first apply a toner containing salicylic acid, which will help dry up excess oil. Next, use an oil-free moisturizer or a gel-based or serum moisturizer.
“Look for those containing ingredients such as glycerin, D-glucuronic acid, Aloe barbadensis leaf extract, L-limonene, and sodium PCA,” says Dr. Fusco, as they provide moisture without the heaviness of oils.
Another popular choice is a hyaluronic acid serum, which packs a powerful punch without clogging pores. According to a study published in the Journal of Clinical and Aesthetic Dermatology, hyaluronic acid is one of the best topical products to combat wrinkles, increase firmness and elasticity, and retain the skin’s natural moisture, which is doubly important when home and office heating systems start firing up.

Try a Combination Strategy for Combination Skin

There’s nothing worse than skin that’s dry and oily at the same time. To hydrate combination skin, you’ve got to be strategic. “Try using a toning pad with glycolic and salicylic acid that you can apply to just your oily T-zone areas,” says Levine. Then follow up with a lotion-based moisturizer on your cheeks and neck, suggests Fusco.

Glycolic and salicylic acids are both incredibly popular and effective chemical exfoliators. While they each work differently, when used in tandem they provide far-reaching benefits. Research shows that these two popular hydroxy acids do everything from exfoliate to hydrate and even regenerate skin cells, creating overall healthier, more radiant skin.

Ceramides for Skin Conditions like Psoriasis, Eczema, and Rosacea

People with psoriasis may experience dry, flaking skin, especially along their scalp line or in their T-zone, says Levine. If this is the case, “look for moisturizers that are soothing and calming,” she says. “Those with ceramides can provide extra hydration, while hydrocortisone can be helpful in areas of inflammation.”

You’ve probably heard the word "ceramides" thrown around a lot. Ceramides are lipids, or fat molecules, that are an essential component of the skin’s barrier function and help keep your skin feeling soft and hydrated, according to a study published July 2016 in the journal Physical Chemistry Chemical Physics. Ceramides can also help protect skin from environmental stressors like pollution and seasonal changes, like dry air.

Additionally, research shows that low ceramide levels have been linked to atopic dermatitis or eczema.

For eczema-prone skin, Levine recommends a thick moisturizer — either a ceramide-based cream or an ointment like Aquaphor or Vaseline. And be sure to avoid anything with harsh chemicals or fragrances.

People with rosacea should look for products with anti-inflammatory agents. “Green tea creams are especially good for rosacea,”

If you’re starting a strength routine, you might be tempted to try some of those cool moves all the fitness influencers are showing off on Instagram. However, it’s important to have a solid foundation first. Even the fittest of the pack had to start with the basics. So, if you’re new to strength training, your best bet is to start by mastering a handful of basic exercises — then worry about the insta-worthy exercises later.

Think of the pushup: If you try a version that’s too advanced for you right now, you’ll likely feel it in your neck or elbows, as opposed to your chest, shoulders and arms. But if you start with an easier pushup variation, you’ll learn how the move is supposed to feel, and build strength in all the right places.

1. BODYWEIGHT SQUAT
“Major muscle groups are used in the [squat], all of which are needed to live a functional and healthy life,” says Doris Thews, senior vice president of fitness and innovation for VASA Fitness and 2019 IDEA Fitness Instructor of the Year. Plus, bodyweight squats serve as a foundational movement that many other exercises are based off of, she adds. So, if you want to do back squats, jump squats or wall sits, you have to nail basic bodyweight squats first.
The move: Stand with your feet hip-width apart. Push your butt back and bend at the knees to lower your hips toward the floor. Aim to end with thighs parallel to the floor and knees in line with your toes. Drive through your heels to push back to standing.
2. PUSHUP
“If you can learn to do the pushup, you’ll have a good foundation to go into other pressing exercises, like the bench press,” Lefkowith says. Just be sure to start with the right variation for your current ability level.
The move: Get into high plank position on the floor. Your hands should be directly under your shoulders, slightly wider than your ribcage. Brace your core and bend at the elbows to lower your body to the floor with control. Make sure your elbows flare out no more than 45 degrees. Push back up to the top position. Elevate your hands on a bench, or drop to your knees if needed.
3. STATIC LUNGE
Bodyweight lunges, in general, are a basic movement, but are often blamed for knee pain. Static lunges tend to be one of the better options for beginners, because you are better able to control the muscles you use to perform the move, Lefkowith says. “The up-and-down movement can also improve your hip mobility, while allowing you more stability instead of having to control a step forward,” she adds.
The move: Stand with your feet hip-width apart. Take a big step back with one foot and lower your back knee down toward the floor to create a 90-degree angle with both knees. Shift your weight onto your front foot, first making sure your front knee is in line with your front ankle. Then, drive through the heel of the front foot and engage the glutes to push yourself back up to standing until both legs are extended. Without moving your feet, bend your front knee to start your next rep. Keep your shoulders down and back throughout the movement. Do all reps on one side before switching to the other.
4. INVERTED ROW
The inverted row is a great beginner back- and shoulder-building exercise because it’s easy to modify to suit your current level of strength. It also teaches you how to keep your body stable as you pull yourself up to the barbell.
The move: Stand tall. Place a barbell in a rack at about waist height (put the barbell higher in the rack to make the movement easier). Hold the barbell with both hands using an overhand grip and allow your arms to extend fully. Your body should be a straight, plank-like position. Pull your elbows straight back to bring your sternum in contact with the barbell (you may need to adjust your foot position to make this possible). Pause briefly at the top of the movement before lowering yourself back down with control. Step your feet forward to make the move more challenging.
You can also use a suspension trainer or gymnastic rings for inverted rows.
5. FOREARM PLANK
The plank is a key move to master when you’re just starting out. “It helps you build up your core strength for pushups and inverted rows,” Lefkowith says. “It will also help you learn how to engage your abs to protect your lower back during squats and deadlifts,” she adds.
The move: Set-up on the floor in a plank position with your elbows bent and directly beneath your shoulders, forearms flat on the floor. Extend both legs behind you and support your weight on your toes. Brace your core and squeeze your glutes to hold the position. Don’t allow your low-back to sag toward the floor. Thews recommends beginners start by holding the position for 10 seconds, gradually building their way up to 1 minute. If you can’t hold a straight-leg plank, begin with your knees on the floor.


Losing weight—and keeping the pounds off—isn't a quick or easy process, but a few simple diet tricks can be a big help along the way. Our favorite? Eating lots of protein, fiber, and healthy carbs, which boost your metabolism and keep you feeling energized and satisfied.

1. BUTTERNUT SQUASH BLACK BEAN CHILI  


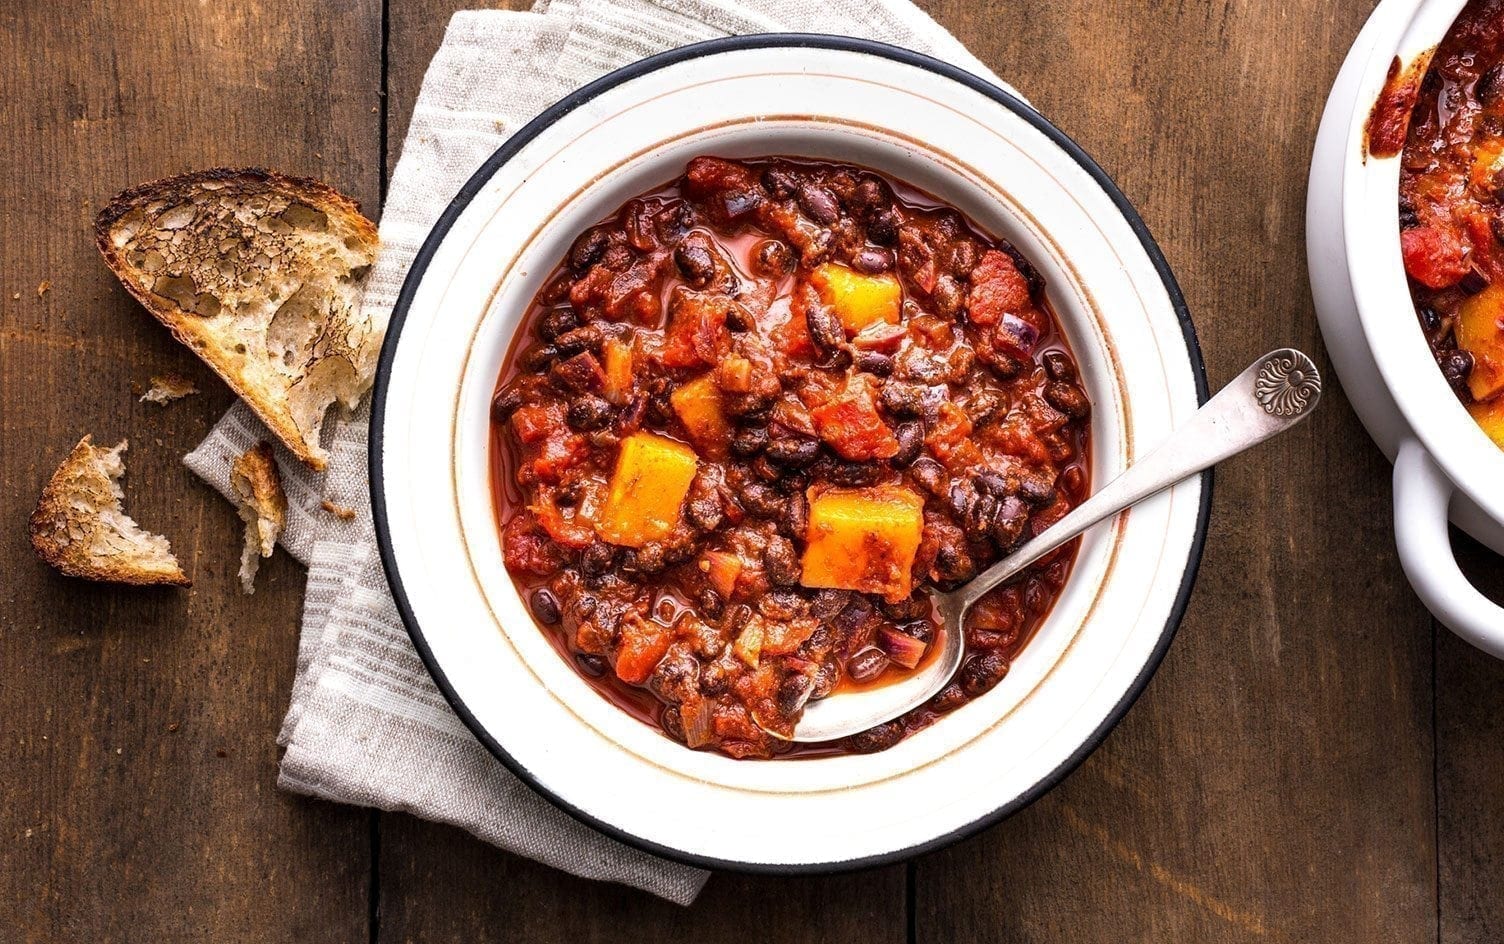
Nutrition (per serving): Calories: 281; Total Fat: 0g; Saturated Fat: 0g; Monounsaturated Fat: 0g; Cholesterol: 0mg; Sodium: 251mg; Carbohydrate: 56g; Dietary Fiber: 20g; Sugar: 3g; Protein: 15g

This vegetarian chili calls for hearty butternut squash and black beans, which means it’s high in fiber. One serving provides more than half of your fiber quota for the day and has 15 grams of plant-based protein.

Ingredients
  • 2 cups (300g) butternut squash, diced
  • 2 15-ounce (425g) cans black beans, drained
  • 1 red onion, diced
  • 1 15-ounce (425g) can diced tomatoes
  • 1 15-ounce (425g) can crushed tomatoes
  • 2 tablespoons chili powder
  • 2 tablespoons ground cumin
  • 2 tablespoons smoked paprika
Directions
Place all ingredients in a large stockpot and simmer until butternut squash is tender and the flavors have melded about 30–40 minutes.


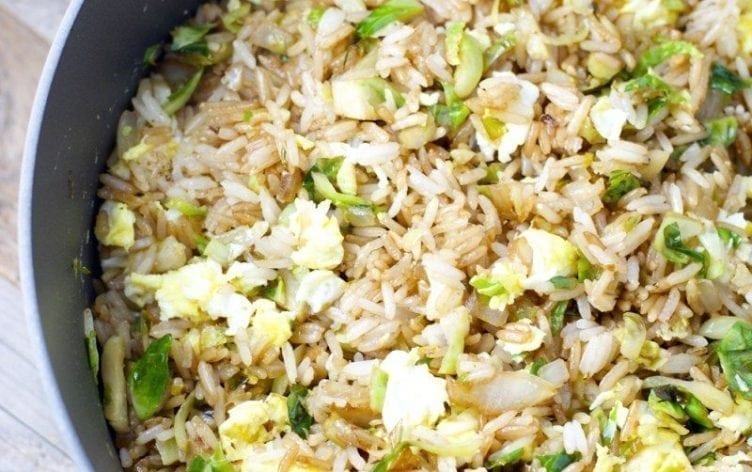
2. CRISPY BRUSSELS SPROUTS FRIED RICE


Crispy Brussels Sprouts Fried Rice
Nutrition (per serving): Calories: 236; Total Fat: 10g; Saturated Fat: 2g; Monounsaturated Fat: 4g; Cholesterol: 93mg; Sodium: 496mg; Carbohydrate: 31g; Dietary Fiber: 2g; Sugar: 2g; Protein: 7g

Brussels sprouts lovers, rejoice! Maebells’ crispy fried rice is loaded with flavorful bits of this trendy veggie. It’s quick (ready in 15 minutes!) and keeps dinner prep simple. Brussels sprouts are a cruciferous vegetable jam-packed with vitamins K and C. To make this a complete meal, add grilled chicken, shrimp or tofu.

Ingredients
  • 2 teaspoons minced garlic
  • 2 tablespoons toasted sesame oil
  • 2 cups (400g) cooked jasmine rice (certified gluten-free if necessary)
  • 2 cups (200g) shredded Brussels sprouts
  • 1 small onion, chopped
  • 2 tablespoons soy sauce (certified gluten-free if necessary)
  • 2 eggs, beaten
Directions
Heat a large skillet or wok to medium heat.
Add the sesame oil and minced garlic. Sauté garlic until fragrant, about 20–30 seconds.
Add the shredded Brussels sprouts. Cook for at least 30 seconds without stirring, until they start to brown slightly.
Once they start to crisp up, stir the sprouts, then add the onion and cooked rice. Let sit for 30 seconds before stirring.
Stir the rice mixture, and let cook for at least one minute, until the onion is tender.
Stir in the  soy sauce, and cook for 30 seconds more.
Push the fried rice to one side of the pan, add the eggs, scramble and stir into rice mixture.


3. PUMPKIN SPICE PANCAKES   


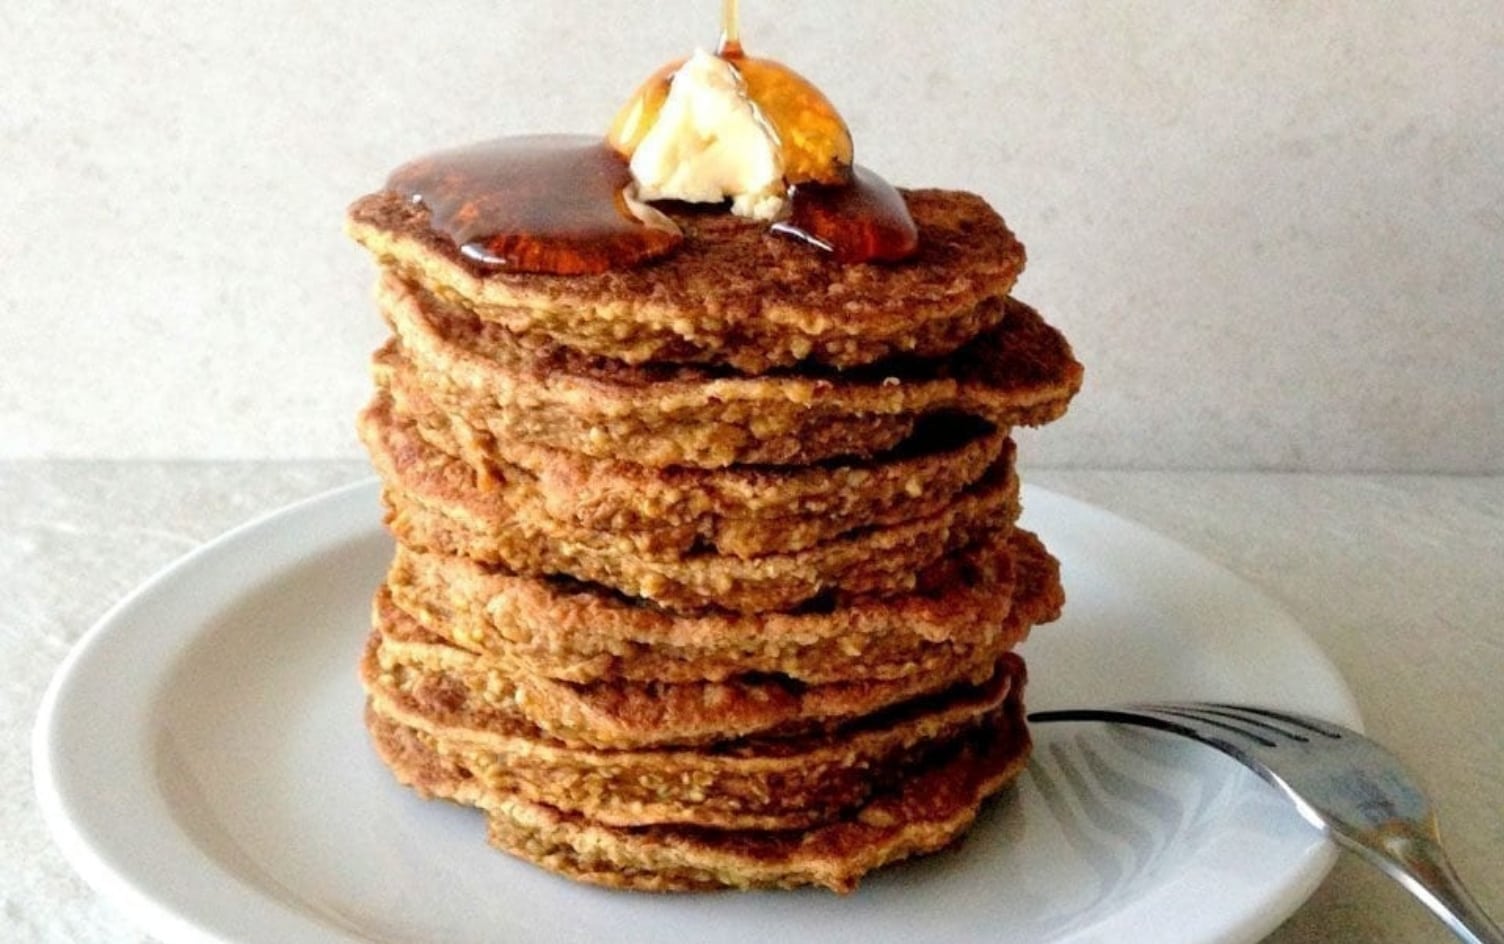
Nutrition (per serving): Calories: 237; Total Fat: 12g; Saturated Fat: 7g; Monounsaturated Fat: 1g; Cholesterol: 106mg; Sodium: 497mg; Carbohydrate: 23g; Dietary Fiber: 5g; Sugar: 2g; Protein 8g

With pumpkin spice lattes, pumpkin butter, pumpkin pie and pumpkin everything, we know you’re going to see enough pumpkin recipes to last you a lifetime. In that spirit, we bring you these pumpkin spice pancakes courtesy of the Wheatless Kitchen. Thick, hearty pancakes made from oats and pumpkin puree packs the dish with plenty of fiber and vitamin A. These pancakes are gluten-free but can easily be enjoyed by anyone with a wholesome love for pumpkins!

Ingredients
  • 3/4 cup (90g) oat flour (certified gluten-free if necessary; all-purpose flour will also work)
  • 1/4 cup (22g) whole oats (certified gluten-free, if necessary)
  • 1 cup (125g) pumpkin puree
  • 2 large eggs
  • 1/4 cup (60ml) unsweetened vanilla almond milk
  • 1 teaspoon vanilla extract
  • 1/2 teaspoon ground ginger
  • 1/2 teaspoon cinnamon
  • 1/2 teaspoon pumpkin spice
  • 1/2 teaspoon salt
  • 1/2 teaspoon baking soda
  • 2 tablespoons coconut oil (or other cooking oil of choice)
Directions
Preheat skillet or stovetop griddle pan on medium heat. In a large bowl, combine all of the ingredients with the exception of the coconut oil and whisk until well combined. Melt coconut oil in the skillet and using an ice cream scoop, scoop batter onto the skillet and with the back of a spoon, form each into a round pancake. Let it cook for 2–3 minutes, then flip and cook another 2 minutes. Transfer to a plate while finishing the rest of the batter. Enjoy with your favorite toppings!
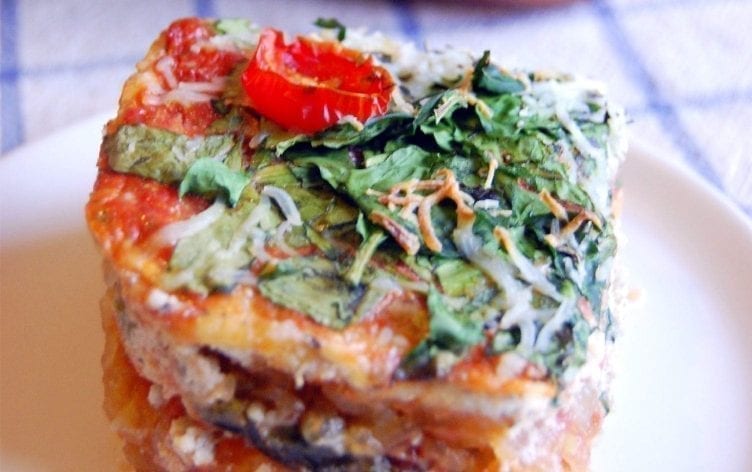
4. SPAGHETTI SQUASH LASAGNA 


Spaghetti Squash Lasagna
Nutrition (per serving): Calories: 129; Total Fat: 6g; Saturated Fat: 2g; Monounsaturated Fat: 1g; Cholesterol: 68mg; Sodium: 192mg; Carbohydrate: 13g; Dietary Fiber: 3g; Sugar: 5g; Protein: 7g

vegetarian spaghetti squash lasagna is a gluten-free, low-carb, and saucy delight! This main dish features simple ingredients like spaghetti squash, baby spinach, and mozzarella cheese. Make this one-dish casserole in advance and freeze pre-portioned leftovers for a quick reheatable dinner. It’s perfect for those busy nights!

Ingredients
  • 1 medium spaghetti squash (about 4 cups cooked, divided)
  • 1 1/2 cups (360 ml) low-fat ricotta cheese, divided
  • 1 large egg
  • 1 teaspoon (5 ml) dried basil
  • 1 teaspoon (5 ml) dried oregano
  • 1/4 teaspoon (.2 ml) garlic powder
  • 1 1/2 cups (360 ml) thick marinara sauce, divided
  • 4 cups (960 ml) fresh baby spinach, chopped and divided
  • 1/2 cup (120 ml) part-skim mozzarella cheese, divided
  • Grape tomatoes (optional garnish)
  • Red pepper flakes (optional garnish)
Directions
Slice spaghetti squash in half, remove the seeds, and bake it flesh side down for 40 minutes at 350°F.
To make this recipe quickly, use leftover spaghetti squash. Run a fork into the spaghetti squash to create strands, and throw away the skin. Use a paper towel to pat away excess moisture.
Preheat the oven to 350°F.
Combine the ricotta with the egg, basil, oregano, and garlic powder.
Begin layering by placing 1/2 cup of the marinara sauce in the bottom of a greased 8×8 or 9×9 pan. Continue with 2 cups of cooked spaghetti squash, 3/4 cup of the ricotta mixture, 2 cups fresh chopped spinach, 1/2 cup marinara sauce, and 1/4 cup mozzarella. Repeat the process once with those same amounts (layering spaghetti squash, ricotta, spinach, pasta sauce, and finally mozzarella).
Garnish with sliced grape tomatoes, any additional chopped spinach or mozzarella, and red pepper flakes.
Bake uncovered for 30 minutes, until bubbling.
Let it sit for 10 minutes before slicing. To serve immediately, use a slotted spoon and allow any excess liquid to drain out of the pan. Leftovers will be even firmer and slice into nice squares.
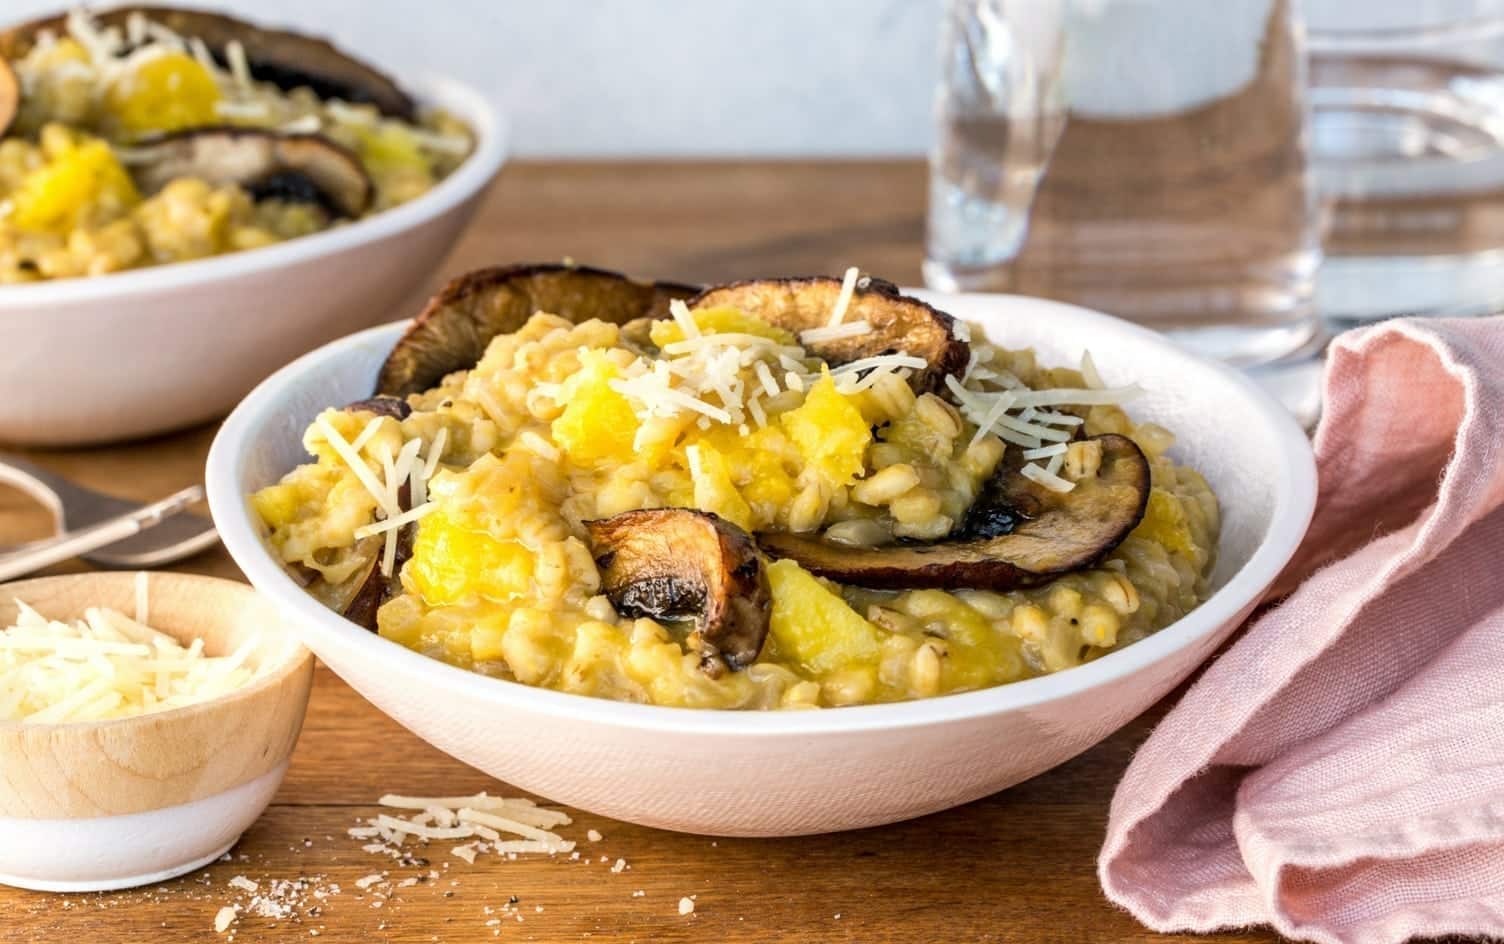
6. SEARED PORTOBELLO MUSHROOM AND SQUASH BARLEY RISOTTO 
Nutrition (per serving): Calories: 245; Total Fat: 5g; Saturated Fat: 2g; Monounsaturated Fat: 2g; Cholesterol: 6mg; Sodium: 272mg; Carbohydrate: 42g; Dietary Fiber: 8g; Sugar: 3g; Protein: 8g
This is creamy risotto without the cream, clocking in at less than 250 calories per bowl. Plus, if you love the deep orange sweetness of squash, you’ll love this beta-carotene-rich risotto. Pearled barley has more than double the fiber of arborio rice (traditionally used in risotto) and gives off healthy starches to thicken the broth as it cooks. A pop of lemon adds a savory note.
Ingredients
  • 1 tablespoon olive oil, divided
  • 1 medium onion, chopped
  • 1 medium acorn squash, about 1 1/4 pound (550g)
  • 1 cup (200g) pearled barley
  • 1/4 cup (60ml) white wine
  • 1 teaspoon dried thyme
  • 4 cups (100ml) vegetable stock, no salt
  • 2 teaspoons lemon juice
  • 6 tablespoons shredded parmesan cheese
  • 1 large portobello mushroom, cut in 12 slices
Directions
In a large pot, spread 2 teaspoons of the olive oil, and place over medium-high heat. Add the onions and stir until they start to sizzle. Reduce the heat to medium low and cook, stirring occasionally.
While the onions soften, halve the squash and place in a steamer over simmering water. Cover the pot and steam for 10 minutes. When the squash is tender when pierced with a paring knife, take out and let cool; scoop out the flesh with a spoon. Mash the squash to make about 2 cups (550g). Reserve.
To the onions, add the barley, white wine, thyme and stir, then add in the stock and raise the heat to high. When the mixture boils, reduce the heat to low and cover. Cook for 30 minutes, then uncover and stir in the squash. Simmer for 5 minutes or so, until thick and creamy. Stir in the lemon and parmesan. When the parmesan is melted, remove from the heat and cover loosely.
Heat a large, well-seasoned cast-iron skillet over high, then drizzle with remaining olive oil. Place the portobello slices in the pan in one layer, and cook for 3–4 minutes, until shrunken and deeply browned. Serve 1 cup risotto with 2 slices of mushroom arranged atop.